Thursday, March 31, 2011

A New Slipcover for my shameful couch

Several years ago I inherited this ugly, schizophrenic yet comfortable couch. 


She sat in the unfinished basement for a few years and was never used.  Then about 4 years ago, I moved and didn't have an unfinished area to hide her in.  So, I am embarrassed to say this, but she has been sitting in my house just as ugly as can be and I didn't do a thing about it. 

Finally, I have gotten my act together and made my very first slipcover...


Doesn't she look so much better?  Now I don't have to be ashamed when people come to my house.

Did you notice the adorable embroidered throw pillows?  Aren't they great?  These were a gift from my mom and you can read all about them here.  Stop by her blog and check them out!!!


Transformation Thursday


Photobucket


Furniture Feature Fridays


Monday, March 28, 2011

The Ruffled Rose Petal Pillow Tutorial

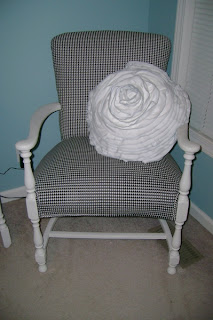
I knew when I recovered my chair, I wanted to make a cute, fun and flirty pillow to decorate it.  It seems like everywhere I look, there are ruffles, ruffles and more ruffles.  And who doesn't love ruffles? 

So, I decided to make a Ruffled Rose Petal Pillow...


...and now you can too!!

Materials Needed:
White cotton fabric for pillow form (amount depends on size of pillow you want)
2 yards white (or whatever color you want the flower to be) jersey knit
Batting to stuff the pillow
Thread

Step 1:  We start out by making the pillow behind the rose petals.  Determine how large you want your pillow to be and cut two circles.  I decided to go big, so my circles are 18 inches diameter.


Step 2:  Now it's time to make some ruffles.  Cut jersey knit into 3 inch strips.  I used my serger  and serged the outer edge with a mixture of threads in blue, light blue and gray.  If you don't have a serger you could use a decorative stitch or leave it untouched.


Next you want to ruffle the opposite edge of the jersey knit strips than the one you just serged.  My serger has a built in ruffler, so I used that.  If you don't have a ruffler foot to attach to your machine, you can hand ruffle the strips as you stitch it on to the pillow.  Also, if you don't have a ruffler foot....get one!  They are amazing!!


Step 3:  Time to create a rose!  Now that we have all the ruffle we need, it's time to stitch it on the pillow.  Starting from the outer edge of one of your circles you cut out in step 1, pin the ruffle all the way around until the entire edge is covered and stitch in place.  Without cutting the ruffle, pin another circle between 1/2 inch to an inch in from the outside ruffle.  It isn't necessary to be exact here...I just estimated as I went. 


Continue stitching each circular row down, one at a time. This can become a little time consuming, but it's worth taking the extra time to pin one row at a time. 


Eventually you end up at the center.  I folded in a few extra inches of my ruffle to give the center some fullness.


Step 4:  Put the pillow together!  Now that you have created your rose, you want to create your pillow.  With right sides together, stitch the other circle to your rose petal.  Leave a small opening so you can flip the pillow right side out and stuff it. 


Step 5:  Flip the pillow right side out and stuff with batting to desired fullness.  Hand stitch the opening closed.

Viola!!  You now have a fun and flirty ruffled rose petal pillow!


The DIY Show Off

Making

Keeping It Simple


Thursday, March 17, 2011

My Cozy Little Nook

Don't you just love a little cozy nook?  Someplace to relax and take a moment for yourself....


I don't have the largest bedroom, but once I saw this chair I knew I needed to give it a little makeover and then find a spot for it in my room. 


I bought it awhile ago, so I am not 100% sure on this, but I think I paid $6 for it.  It had some stains on the seat and some markings on the arms.  No problem since I was planning on painting it and recovering it.

I didn't apparently take a picture in between start and finish.  But, here is the finished chair...


Isn't it beautiful?  I might be a little biased, but I am just in love with how it turned out.  Plus, I got to use my new double welting foot to make the covered rope trim.


How did I ever live without this foot before?


Check back soon for the tutorial on my fun rose petal jersey pillow....


Transformation Thursday


Photobucket

Furniture Feature Fridays


Wednesday, March 2, 2011

Aeropostale inspired sweatshirt, and a tutorial

I don't normally shop at Aeropostale...in fact I am not sure I had ever been in the store before this past Christmas.  However, I was lured into the store last year to shop for my twelve year old niece.  Apparently, the only clothes worth wearing are the ones sold at Aeropostale.  Anything else would be too embarrassing to be seen in public wearing. 

In my opinion, it isn't all that different from Old Navy...except for the prices are higher.  But, I did discover this really cute sweatshirt when I was there. 

When I say cute, I am talking about the method of design...not the actual design.  It might be hard to tell from this picture, but the applique fabric is frayed are weathered.  I wish I could find a better picture to show you, but trust me it was cute.  So, I decided to make one for myself.  Since I graduated from KU and it is almost time for March Madness, I designed a Rock Chalk Jayhawk sweatshirt.


Now it's your turn...


1. After designing your applique, cut it out in felt.  I used a Cricut to cut my design out of freezer paper and ironed it on to the felt.  If you don't have a Cricut you could print your design on paper, cut it out and trace it onto the felt.  (Be sure to trace the reverse of your design on the back side of the felt so you won't have any ink marks showing when you are finished.) Then cut the felt design out.


2. Once you have all the felt pieces, lay them right side down on top of your applique fabric and using them as stencils, trace the design onto the fabric.  Cut each letter/design out of the fabric.


3. Lay the felt pieces out on a piece of cardboard and cover with spray adhesive.


4.  Attach each fabric letter/design to each corresponding piece of felt.  Make sure to have all ink markings on the back side.


5. Lay your design out on the sweatshirt and pin each piece in place.  Carefully stitch each piece down making sure not to catch the back side of the sweatshirt. (If using letters in your design, stitch both the inside and outside seams of each letter...i.e. stitch around the inside circle and outside circle of the "O".)


6. Wear your new sweatshirt and enjoy all the compliments you will be getting!