Showing posts with label clothing. Show all posts

Friday, January 20, 2012

Superheroes come in all shapes and sizes...

I am not quite sure how the time has gotten away from me, but it has been 2 weeks since my last post.  I am on the verge of putting my house on the market, so I have been spending all my spare time trying to finish up a few small projects to get it ready.

Hopefully I can get my act together and try to be a little more organized with my time.   Especially since I have joined the Naughty Notions Challenge and need to get my clutch done!  I have started my first attempt, but I am not all that thrilled with how it is turning out.  I think I just need to sleep on it and decide in the morning if I am going to move on to plan B.

Now, on to the superheroes in my life.

It all starts with a boy named George...


George is 5 and doesn't like to go anywhere without his superhero cape on.  So, I knew for Christmas I wanted to make him a personalized one.  (Since, I have 3 nephews between the ages of 3 and 5, I made one for each of them.)


(It was a little chaotic that day, so I didn't get pictures of each one wearing the capes, but this is what Charlie's cape and Connor's cape looks like)


George loved it so much that he wore it home.  Oh yeah, and they are reversible...


Even grandpa was a little jealous and had to have a turn being the superhero.  Which led to this...


and this...


It was fun to see them really enjoying the capes.


Bubbly Nature


Funky Junk's Saturday Nite Special


Friday, January 6, 2012

Old Shirts = New Scarf

A while back I decided I wanted to do a few recycled projects with old t-shirts.  I asked everyone I know to clean out their dressers and donate a few t-shirts to my cause.  I couldn't believe how they all came through for me...


Three quarters of this pile is from my brothers and their families.  The other quarter is from the 98 cent sale at the DAV Thrift store.

I already had several projects in mind. Revamp a few t-shirts into a new look, a scarf, an ipod case, a laptop sleeve, a few green bags, a scarf, a skirt, maybe a few pair of pajama shorts, etc.

I may not get through all of those projects, but I will definitely get several of them made.  So, let's start with the scarf...


I decided to get a little scrappy with this project.  I picked 25 t-shirts that had fun or colorful prints on them and cut them up into 9" x 4" rectangles.  I made sure not to put two t-shirts of the same color next to each other, but other than I just start picking up pieces and stitching them together to create the front of the scarf. Then I took a piece of solid navy jersey fabric that I had in my stash and cut it to the same size as my scarf front.

To add a little feminine flair to the scarf, I stitched a ruffle on each end before stitching the front and back together.


The coolest thing about this scarf was that when I wore it around my family, everyone could look at the scarf and see what used to be there t-shirt...and everyone had a little piece in there.  

Plus, it keeps me a lot warmer than I expected.  Perfect for cool days.


Tuesday, November 22, 2011

Crafty Upcycle #1: Ombre Bleached Jeans Tutorial

I am totally on board with this explosion of the ombre trend.  So, I decided to give a few pairs of old jeans a new look...one successfully and one not-so-successfully. 

Here are the before looks:


 This was a pretty easy, yet time consuming process. 

Supplies Needed:

Old (or New) Pair of Jeans
Bleach
Large Bucket or Bin
Pants Hanger with Clips

A word of warning...if you are planning on doing this, try to organize it when you can do it outside.  I was not that smart and bleached these in a bucket set in the bathtub in a bathroom with no window.  By the end of the night my eyes were burning so bad that I was having a hard time focusing on my bleach fumes induced hallucinations.  

Step 1:  Mix 12 cups of bleach with 6 cups of water in the large bucket or bin

Step 2:  Attach hanger to jeans on the end you are not going to bleach (I recommend you leave the waist the darkest and go lighter towards the bottom)  The hanger will help you control how evenly  the jeans are set in the liquid.  


Step 3:  Once you have decided where you want the first layer of faded color to be, fully immerse the jeans in the bleach/water mix up to that point.  Leave the area that you want to remain the darkest out of the mix.  Let the jeans soak for at least 10 minutes.

Step 4:  Remove the jeans from the mix and let hang dry for at least 30 minutes to allow the bleach to take effect.


Step 5:  Repeat Steps 3 & 4, but each time leave a larger section of the jeans out of the bleach/water mix.

Step 6:  Once you have bleached the entire pair, let hang dry over night.  Wash the jeans and they are ready to wear.

Note:  One pair that I bleached turned yellowish in the area that was supposed to be white.  I soaked them in liquid dish soap for a few hours and then washed them with OxiClean twice and they came out white. 

Here is the final product: 

Let's start with the bad news first....my failure jeans:


(Please don't judge me on my lack of a pedicure)


This look just didn't work.  So...I guess now I shall try, try again.  Maybe a denim skirt or a coin purse.  To be continued....

Now on to the good news...my success jeans:


This worked so much better!  I was thrilled with the final result and now I have a pair of jeans that are a little  more exciting than the rest of them.


Tuesday To Do Party

Tip Junkie handmade projects


Photobucket 

Wednesday, March 2, 2011

Aeropostale inspired sweatshirt, and a tutorial

I don't normally shop at Aeropostale...in fact I am not sure I had ever been in the store before this past Christmas.  However, I was lured into the store last year to shop for my twelve year old niece.  Apparently, the only clothes worth wearing are the ones sold at Aeropostale.  Anything else would be too embarrassing to be seen in public wearing. 

In my opinion, it isn't all that different from Old Navy...except for the prices are higher.  But, I did discover this really cute sweatshirt when I was there. 

When I say cute, I am talking about the method of design...not the actual design.  It might be hard to tell from this picture, but the applique fabric is frayed are weathered.  I wish I could find a better picture to show you, but trust me it was cute.  So, I decided to make one for myself.  Since I graduated from KU and it is almost time for March Madness, I designed a Rock Chalk Jayhawk sweatshirt.


Now it's your turn...


1. After designing your applique, cut it out in felt.  I used a Cricut to cut my design out of freezer paper and ironed it on to the felt.  If you don't have a Cricut you could print your design on paper, cut it out and trace it onto the felt.  (Be sure to trace the reverse of your design on the back side of the felt so you won't have any ink marks showing when you are finished.) Then cut the felt design out.


2. Once you have all the felt pieces, lay them right side down on top of your applique fabric and using them as stencils, trace the design onto the fabric.  Cut each letter/design out of the fabric.


3. Lay the felt pieces out on a piece of cardboard and cover with spray adhesive.


4.  Attach each fabric letter/design to each corresponding piece of felt.  Make sure to have all ink markings on the back side.


5. Lay your design out on the sweatshirt and pin each piece in place.  Carefully stitch each piece down making sure not to catch the back side of the sweatshirt. (If using letters in your design, stitch both the inside and outside seams of each letter...i.e. stitch around the inside circle and outside circle of the "O".)


6. Wear your new sweatshirt and enjoy all the compliments you will be getting!


Friday, November 19, 2010

A few baby gifts...

I have made several baby blankets as gifts over the last few years, but I this one is definitely my favorite.


I love the random mix of fabrics...not so matchy-matchy.  And of course the ruffle makes this blanket ten times better than any other blanket.


Plus, who doesn't love minky dot?  So soft and cozy...it makes it feel so rich.

I was pretty tempted to keep it.  I would never get away with it though. My friend and I picked the fabric out together for her daughter, so she was expecting it to arrive. I threw in a couple of other gifts as well...

A wrap sling...all dolled up.  This sling is basically just a long thin piece of jersey knit, but I dressed it up a bit with this playful glitter butterfly gauze fabric.  It really turned out great. 


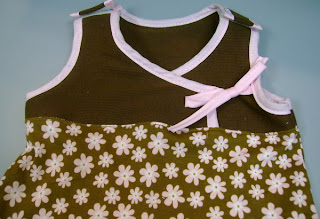
And last, but not least...I made a sleep sack.  I love the criss cross top.  It has a bit of a kimono feel to it, which is perfect for my friend's style.  Both top and bottom are made from heavyweight knit. 


I probably should have made it out of fleece or flannel to provide a little extra warmth for the winter months, but I didn't think that far ahead. One of these days, I will learn to think through the whole project before I jump right in and start making it.